Friday 29 January 2016

FMP Week 3 Blog 2

Rear lights and added more geometry to the Exhaust
 License Plate.....Thing


Fuel Cap

Ariel


Rim & Tyre


All the vents


As you can see in this last picture I have a big problem with the model being over budget. It's currently at 68k, my budget is 60k. I am also yet to model the interior, amongst a few other features. This is an issue which I will have to resolve. Hopefully when I start collapsing and then editing the high polly's I will get it in budget. 

Thursday 28 January 2016

Week 3: More Modelling

I’m really starting to get the form of the car. I’ve also started using Turbo Smooth in the modifier stack. I’ve realised that I should have been working like this from the start. For the first week of modelling I was trying to get the cars form with the base geometry because of this it ended much to geometry dense. Now when I turbo smooth the mesh which adds a huge amount of additional geometry it’s far too high poly.


Cutting out all the panels, doors, bumpers etc. 


Rear Bumper


Turbo smoothing

Below I’m showing some of the issues with modelling with a turbo smooth in the modifier stack.


In order to get this form at this tri count the base mesh is extremely low poly. Also to force the Turbo smooth to create the forms that you want, you have to add additional supporting geometry along any dramatic changes in surface topology e.g. angles, seams, etc. Once I start collapsing the modifier stacks towards the end of modelling I will have to put work into retopologizing the high polys.

 Turbo smoothed bumper


Base mesh


Allot of the underside of the car is visible, because of this I have started to model an extremely low poly underside. These meshes will not be clearly visible as they will always be in shadow, but their silhouettes may be visible at certain angles when viewing the car.


You can see here the front grill slats as well as the side skirt. If I modelled these features as they are on the real car it may cause issues with anti-aliasing, due to them being comprised of very thin and numerous lines.  For my model I have altered the width and number of lines within these areas, due to this being a game asset.    


Thursday 21 January 2016

FMP Week 2: Blog 2, Planning


I've made the above Gant Charts. I can now see exactly how much time I have between now and the deadline. I've neatly broken the projects up into 3 groups of 5 weeks. The first week sadly has already been lost due to extremely bad planning, I feel that I only really started FMP on Monday the 18th. Because of this, this is where this planning begins from. This still gives me 20 weeks between the 18th of Jan and the 27th of May the final hand in date. 

Although I think I am being ambitious with these projects I have given myself a huge period of 5 weeks to compensate for any issues that may acure. If there is free time during this period then I can move onto my stretch goals. 

FMP Week 2 Blog 1

The below image is of the Car model I ordered. Using this model I created my own reference images. I then altered these in Photoshop.

I could then begin modelling the Corvette. 


This is an extremely long process of slowly altering vertices until you get the desired edge/ curve/ silhouette/ form / shape. I'm also using the turbo smooth modifier in the stack. My final mesh will be the Turbo smoothed mesh. You model into the low poly simply because it’s quicker to alter vertices here and then check to see how this appears on the high poly.

Currently I'm still creating the forms to the highest standard. I'm simply trying to create the forms, I'm not putting too much time into creating the most efficient use of the tri budget. I will have to go back into my low poly and make it more efficient once I have nailed the vehicles form.

Design for 3rd Vehicle


Every evening I've been bashing images of planes, cars, bikes and spaceships; and then drawing over them trying to pull out new vehicle designs. These are the first few designs I have come up with for this third vehicle. I have 9 weeks left until this project begins, I will then also have a week of just design at the start of this project to nail down the finale vehicle. 


Friday 15 January 2016

FMP Week 1 Blog 2

I decided that having physical models to reference would vastly increase my efficiency and quality of work throughout these projects. Because of this I have been researching model kits and die cast models, to try and find the best quality and cost effective models. Also this means that I now need to nail down exactly what I will be making during my FMP.

 It eventually came down to these two vehicles. A 1967 Toyota 2000 GT and a 1963 Corvette Stingray. I could get hold of both these models but went with the Corvette due to its slightly more complex Form. The Toyota is entirely made up of curved forms, there aren’t even any creases to follow. I may come back to it another time. The Corvette was also slightly cheaper.

My second vehicle is going to be a chassi and suspension study. Because of this I have chosen to go with an older off road vehicle as the mechanics should be relatively simple. I’m also really into the idea of making a larger 4x4 off road truck/ lorry. Because of this I have bought the above model kit. This is an extremely complex kit that goes into extreme detail which is exactly what I need.


This is an image of the models under side once completed. This model kit covers all the details that I will be covering. 

I’m only going to be using this kit as reference for the mechanics of the vehicle. I’m planning to drop a civilian cab on this chassi.


I have found good ref for the above truck and this is probably the style of cab that my finale truck will have. I’m also going to be further altering the truck by adding larger off road tyres as well as adding the 4x4 suspension and drive train from a WW2 Military vehicle.


Work

Due to waiting for loans and then Shipping the above models which didn't arrive until the Thursday of this week, it was extremely difficult to get started.

I spent some time taking many reference shots of a local Russian military truck.


I initial wanted to get under the truck and try and get an understanding of the drive train, chassi and suspension. But there was a large amount of glass so this was impossible. I did spend time getting as many pictures as possible as there are many things that I could pull from this vehicle. I could even use parts of this on my 3rd designed vehicle. As I had no reference that correlated exactly to my projects I decided to begin modelling by making the wheels from this truck. As my truck is going to be a homemade hodgepodge of parts so this is actually fine.

3D


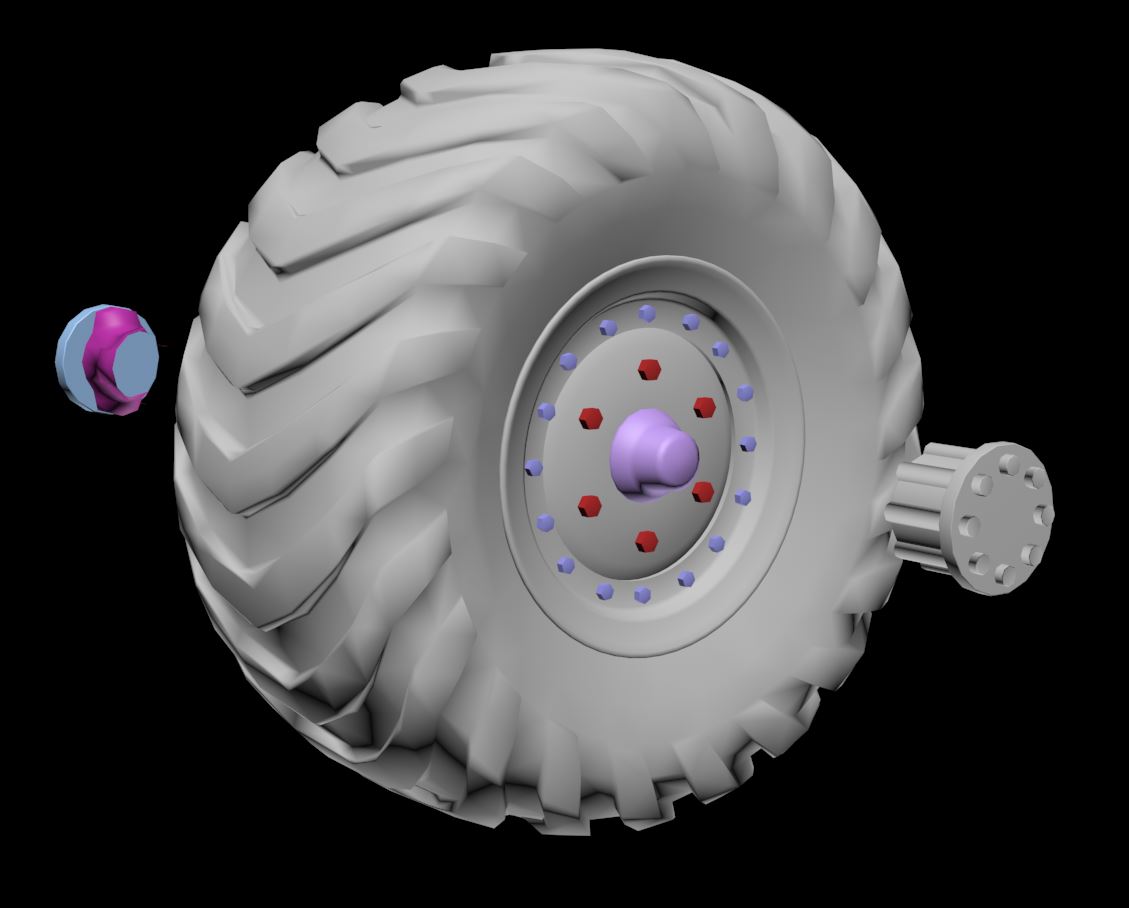
I made the wheels. I have actually modelled the tread, I’ve done this because the wheels are going to be massive, I also think that it is important to capture the gnarly off road tread of these tires they are an important feature of this vehicle so it’s worth spending a huge amount of tries here. Currently the wheels are at an extremely high tri count, I may need to further reduce these further, but I’m worried about losing the smooth edges I have achieved.


This is a Porsche 993 done by Safy Saada a level artist at Ubisoft. This is what I have been referencing for my wheels. As you can see they too are relatively dense with tries.


When making these wheels I went through many variations of tri count and general construction. The finale wheel was made from a flat cross section of the wheel in 3DS-Max which was then bent into a loop. This was then smoothed in ZBrush and then Decimated. I then also Ran the Average Normals Script.

 I used Substance painter to check the effects of the Script and then altered my geometry/ restarted until I had the desired result.


Tuesday 12 January 2016

FMP Week 1

It’s the start of my FMP. I have given myself 20 weeks to make 3 high quality current Gen vehicle game assets.

This equates to 5 weeks per vehicle, with 5 weeks at the end for stretch goals.

Vehicle 1
A photorealistic model of a showroom ready vehicle of my choice.

Vehicle 2
A mechanical study of the suspension and drive train of a large truck.

Vehicle 3
Produce a vehicle of my design. This can be anything.

Stretch Goals

Retexture one of the vehicles for Unreal 4 and rig and make drivable.

Retexture Vehicle 1 as if old and used/Rusty.

Further dress the truck, add Barrels, Spare tire, winch, post-apocalyptic paraphernalia.


Vehicle 1 Mood Board


Vehicle 2 Mood Board


Vehicle 3 Mood Boards


Vehicle 3 Initial Designs


I overlaid a bunch of engine and vehicle images.


From this I pulled out the following vehicle designs.